Post-Processing 3D Printed Prototypes

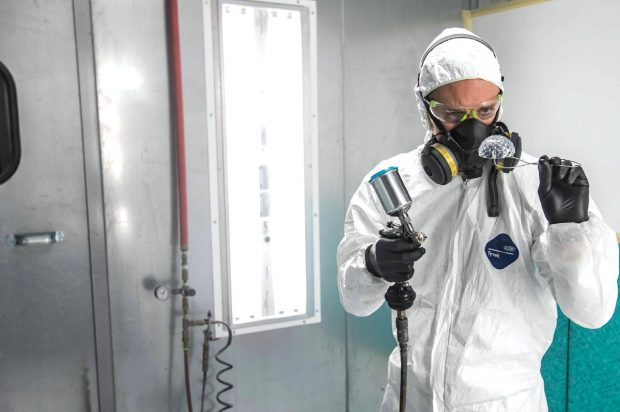
Seatools, a subsea technology company, builds key scale models of its machinery designs using 3D Systems SLS 3D printing with the Duraform PA nylon materials. On completion of the prints, the models are sanded and painted for the company’s trade shows and marketing. Image courtesy of 3D Systems.


Latest News
February 1, 2018
Anyone who has used additive manufacturing to create a part or a prototype knows that pulling the object off of the build plate is only the first step in post-processing. Depending on the material and technology, post-processing a 3D printed object can take as long—or longer—than the print process.
In fact, post-processing can contribute a significant amount of cost to each part through time and labor. In some cases, post-processing can double the time required to generate a finished part. For companies that are actually manufacturing larger batches of finished products, this can represent a significant expense.
 A finisher applies clear coat to a stereolithography part. Image courtesy of Proto Labs.
But what about prototypes? These parts will typically require less post-processing depending on how they will be used, but secondary operations can extend lead times. Luckily, advancements in hardware, software and materials make it easier to produce quality prototypes with less post-processing.
The type of material and the print process used will ultimately determine just how much secondary work will have to be completed to get the prototype into finished form. Optimizing the design to reduce the need for post-processing and selecting a material and print process that best fit the part can reduce the cost of the prototype and increase turnaround time.
Getting to the Finished Part
Post-processing can be broken down into two general categories: Processes required to take the design from the CAD model to the physical component, and processes that affect the aesthetic or mechanical properties of the parts after they are printed.
For most 3D printing technologies, removing support structures is the most common post-processing step, usually accomplished through washing away water soluble supports or breaking them away. With stereolithography processes, this involves a wash or bath to remove excess resin and support structures, followed by sanding of down-facing surfaces and a grit-blast finish over the part. “That satisfies the majority of our customers,” says Andrew Rogers, machine maintenance supervisor and SL process engineer at Proto Labs.
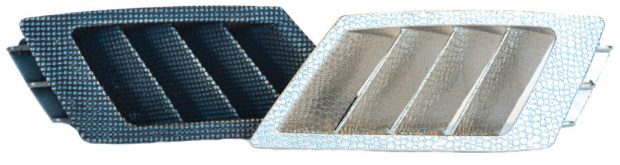 This automotive dashboard vent is shown (left) as the initial piece directly from the Figure 4 production printer and (right) after plating directly onto the part. Image courtesy of 3D Systems.
Selective laser sintering, on the other hand, produces parts in a powder cake that has to cool before the parts are sifted out, the excess material is blown off and the parts go through a bead blast to even out the surface. Other 3D printing processes may require heat treatment, chemical baths, sanding or deburring.
According to Paul Heiden, senior vice president of product management at Ultimaker, the need for post-processing will depend on print technique, material and print settings. Fused filament printers require less post-processing than comparable stereolithography apparatus machines (that require resin removal), he says. By optimizing print profiles and materials, Heiden says that many parts can be used immediately after printing, although dual-extrusion prints with support material do require post-processing. The company uses two types of support material: polyvinyl alcohol (which is water soluble and can be washed away), and a new Breakaway material.
For metal parts, Rogers says Proto Labs typically needs to grind off support structures, file or smooth down-facing surfaces and will then polish or peen the part to provide a consistent finish.
According to Allen Kreemer, senior manager, applications engineering for Stratasys, vibratory tumbling has emerged as an efficient means of finishing multiple parts at once, at least for Fused Deposition Modeling (FDM) printing. That process can take anywhere from 30 minutes to two hours, depending on the size of the parts and the geometry. “The technology allows you to build parts faster at a rougher layer setting,” Kreemer says.
Another operation that can add time to the print process is sealing. Selective laser sintering and FDM printed parts usually require a sealant for testing. This is still largely a manual (and messy) process that Kreemer says hasn’t seen a lot of automation. “There are a number of techniques for sealing pars, including dipping and coating, or brushing/spraying on various epoxies,” he says. “There is definitely some room for improvement on that part of the process.”
In addition to sanding or polishing, there are a number of other processes that may be applied to a prototype to improve its function or its overall appearance. “For post-processing that would [have an] impact on the mechanical or aesthetic properties, there are a lot of options,” says Andy Richardson, senior director of sales and service at 3D Systems. “That can range from plating to anodization, silk screening, dying, etc. It’s really dependent on the intent of the part.”
Holes or internal channels are a functional feature that can require secondary operations after printing. Depending on the print process, the holes may not be accurately sized or may have a rough internal surface and need to be drilled out to meet customer specifications.
From there, prototypes may be painted, dyed or metal plated to achieve a finished look. The emergence of color and multimaterial printing has helped streamline these final steps, however. The Stratasys J750, for example, provides realistic color mapping, printing with up to six materials and realistic textures.
“That has really helped in the prototyping market,” Kreemer says. “We’ve seen a huge market response for being able to closely match Pantone colors and specific things like wood grain or other patterns. We’ve even seen some customers use those parts for photo shoots. With a bit of sanding and clear coating, they look like the final product.”
Multimaterial technologies can better represent the final part, and there has been an increasing demand for multi-material printing according to Rogers at Proto Labs. “That’s one of the reasons we launched our PolyJet service,” he says. “We can do multiple hardness types, elastomerics and we offer overmold prototyping through the PolyJet service.”
Customer Education is Key
To achieve a quality finished part, communication between the company that orders the prototype and the one printing it is critical. “You have to communicate to the customer service team what you are looking for,” Rogers says. “If you need accuracy for holes, or smoothness inside of a hole, that has to be communicated.”
 Seatools, a subsea technology company, builds key scale models of its machinery designs using 3D Systems SLS 3D printing with the Duraform PA nylon materials. On completion of the prints, the models are sanded and painted for the company’s trade shows and marketing. Image courtesy of 3D Systems.
Investigate the limitations of the printing process in advance. That can save time because certain type of builds will lend themselves to specific 3D printing technologies.
“Over the past few years, new customers have been much more educated on additive manufacturing,” Rogers says. “Ten years ago, no one knew any of the limitations. It has gotten easier as time goes by, but education has to happen. You need to ask questions and know what the parts are going to be used for.”
Companies are also more likely to design for 3D printing. “You can create geometries that couldn’t be made using other processes, and they are designed in a way that is complementary to the process being used,” Richardson says. “People are getting more comfortable with the technology and learning how to use the software and other technology to enhance those designs.”
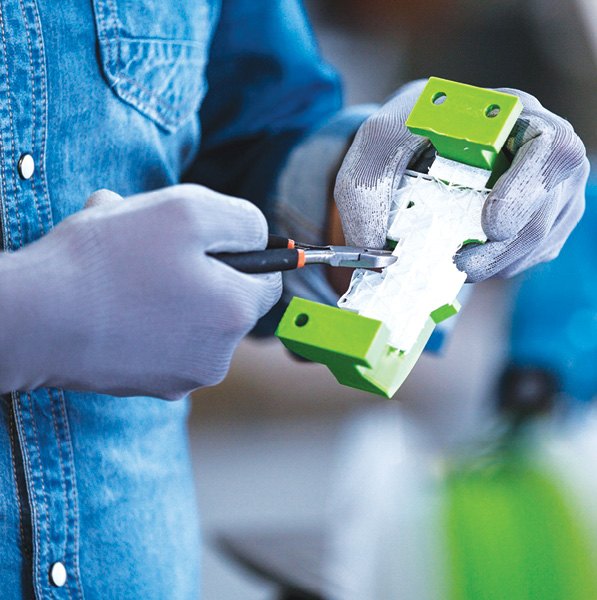 Shown here is the Ultimaker Breakaway material, which makes it easier to remove support structures from a finished product with no additional sanding required. Image courtesy of Ultimaker.
However, there may still be tolerance requirements or finish requirements that cannot be accomplished within the print. “With direct metal, for example, we build parts and use CNC machining to post-machine them to get tolerances or features we need,” Richardson says. That’s why companies should also be prepared for additional cost, in both time and labor, that may be required for finishing each prototype. “The amount of time it takes to get to the finished print can be high and requires a lot of preparation,” Richardson says.
Metal parts may require specialized secondary operations or post-processing that not every service provider offers. Chemical passivation or certified heat treatment, for example, may need to be handled in-house or farmed out to another contractor.
Kreemer at Stratasys says that establishing enough space to accommodate post-processing can also be a challenge for the companies creating these prototypes as print volumes increase. “Companies also struggle to find qualified staff,” he adds. “Depending on what part of the country you are in, there is not a wealth of qualified model makers, and that’s what you need for high-quality prototypes. Even when they have budget approval, these companies might not have the space or staff available.”
New Tech, Practices Can Reduce Post-Processing
Many approaches can help minimize the need for post-processing, during the design phase, as the prototype is printed and—thanks to some new types of automation—afterward.
Design optimization for additive plays an important role. Designers can reduce the need for post-processing by taking into account the limitations of 3D printing when they create the parts or prepare for printing. One common example is tapering or eliminating overhangs to reduce the need for support structures.
The orientation of the part on the build plate can also be changed to reduce the need for supports. “If you orient round features in the draw plane, the hole will be the most round, smoothest—and require less secondary operations than something built on its side,” Rogers says.
 This stereolithography printed part has been dyed red and clear coated. Image courtesy of Proto Labs.
Holes can also be designed as squares and drilled out later, which will reduce the need for supports and additional material. This can also speed up the printing process.
“If you can design a part such that it can be built vertically and smoothly, you will need less post-processing,” Roger says.
Also, prototypes don’t necessarily need to be as “finished” as a final product. Can you live with a textured surface for the prototype to reduce the need for additional post-processing?
Additional automation being introduced in the post-printing phase will also help. Printer manufacturers and service providers are investigating new ways to integrate machining and other operations with the printing process, as well as developing ways to perform secondary operations on multiple parts at the same time.
“It’s the most time-intensive part of the process, so we are seeing development of tools that do that more efficiently,” says Richardson at 3D Systems. “For instance, we are creating equipment that allows us to send a platform of parts through a bath at the same time. There are also grinders and sanders that allow us to finish parts more quickly.”
UK-based Additive Manufacturing Technologies (AMT) recently unveiled its PostPro3D system that can automatically finish multiple sintered nylon parts. Formlabs’ new Form Wash and Form Cure were created to automate washing and post-curing for parts produced on the company’s Form 2 printers.
The Stratasys Robotic Composite 3D Demonstrator presents another way to reduce post-processing requirements using an eight-axis motion system that does not require support material. “It orients the layer lines in such a way that it is not an issue on the part,” Kreemer says. “[That system] separates the part features into different build zones that can build normal to the tip direction. You aren’t slicing the entire part geometry into 2D layers. It gives you a nicer, smoother finish.”
At Ultimaker, Heiden says the company has optimized print profiles for all of its materials in its Ultimaker Cura software. “That will make it much easier for users to print on an Ultimaker 3D printer with all the different materials and ensures that the print quality is good. Software and the right print settings can really help reduce the need for post-processing. So, it is not only about the hardware, but software, and the right print settings can really help reduce the need for post-processing.”
The company also released its Breakaway support material for dual-extrusion printers that adheres to acrylonitrile butadiene styrene, nylon and other materials, and can simply be snapped off of the part and doesn’t require sanding. Massachusetts start-up Rize Inc. has developed what it calls the augmented polymer deposition system, which uses a repelling ink with a medical-grade thermoplastic to create supports that can be easily snapped off.
The most important thing, though, is for designers to understand the technology they are designing for, and that 3D printer operators and finishers have a continuing education program in place to ensure that they stay up to speed on best practices.
More Info
Subscribe to our FREE magazine, FREE email newsletters or both!
Latest News
About the Author
Brian Albright is the editorial director of Digital Engineering. Contact him at [email protected].
Follow DE

