Scanning Service
CRP provides help with reverse engineering, dimensional inspection.
CRP provides help with reverse engineering, dimensional inspection.
Latest News
GE Aerospace Launches as Independent Public Company
Formlabs Introduces Form 4 Resin 3D Printer
Argonne and RIKEN Sign AI-Focused Memorandum of Understanding
Lenovo Debuts ThinkCentre Desktops Powered by AMD Processors
Power of Good Design
Leadership Profile: Marco Turchetto of ESTECO How Automation can Improve Simulation Workflows
All posts
July 26, 2007
By DE Editors
CRP Technology launched a new reverse engineering and dimensional inspection service that provides consulting for 3D scanning, CAD modeling, dimensional inspection, and quality control. CRP says reverse engineering technology is now essential to what it calls the design loop—the process that includes concept development, design engineering, and production.
CRP can create a number of models from 3D point-cloud data: STL for rapid prototyping and production, NURBS surfaces (B class), style surfaces (A class), and parametric solids. The same hardware and software used for reverse engineering can also be used to compare the surfaces of a manufactured part with the original CAD model and highlight dimensional gaps generated during manufacturing. CRP will also perform shrinkage analysis of molded parts, castings, and prototypes.
 |
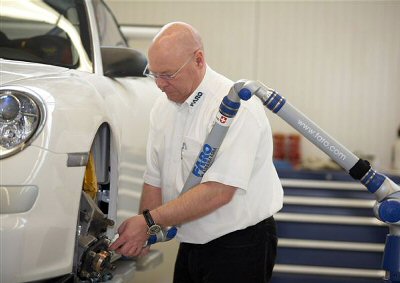
| A 7-axis Faro Platinum arm is the workhorse of CRP’s reverse-engineering service. |
For reverse engineering, CRP uses a portable 7-axis Faro Platinum arm with a Faro laser line probe optical system. The Faro system scans 19,200 points per second. The company also has four 3D CMMs (coordinate measurement machines).
Sources: Press materials received from the company and additional information gleaned from the company’s website.
Subscribe to our FREE magazine, FREE email newsletters or both!
Join over 90,000 engineering professionals who get fresh engineering news as soon as it is published.
Latest News
GE Aerospace Launches as Independent Public Company
Formlabs Introduces Form 4 Resin 3D Printer
Argonne and RIKEN Sign AI-Focused Memorandum of Understanding
Lenovo Debuts ThinkCentre Desktops Powered by AMD Processors
Power of Good Design
Leadership Profile: Marco Turchetto of ESTECO How Automation can Improve Simulation Workflows
All posts
About the Author
DE’s editors contribute news and new product announcements to Digital Engineering.
Press releases may be sent to them via [email protected].
#9719
New & Noteworthy

New & Noteworthy: Safe, Cost-Effective Metal 3D Printing - Anywhere
Desktop Metal’s Studio System offers turnkey metal printing for prototypes and...

New & Noteworthy: Direct Neutronics Analysis on CAD
Coreform Cubit 2023.11 workflows enable neutronics directly on CAD for next-generation nuclear energy...

New & Noteworthy: Agile Engineering Collaboration
Authentise Threads is a new software tool for distributed communications and project...

New & Noteworthy Product Introduction: Enterprise VR Headset
Lenovo ThinkReality VRX has an immersive display works with virtual, augmented and...


