Helping design and engineering professionals discover, evaluate and specify technologies and processes that shorten the design cycle and enable success.

Digital Engineering April 2026
In the latest issue of Digital Engineering, we take a look at the latest innovations in design for additive manufacturing, including the use of natural language inputs, social media cosplayers, and AI integration. The issue also includes a feature…

January Special Focus Issue: Design for Additive
In this Special Focus Issue of Digital Engineering, learn about the latest advancements in design for additive manufacturing, including new software tools, additive in automotive, custom medical devices, and more.
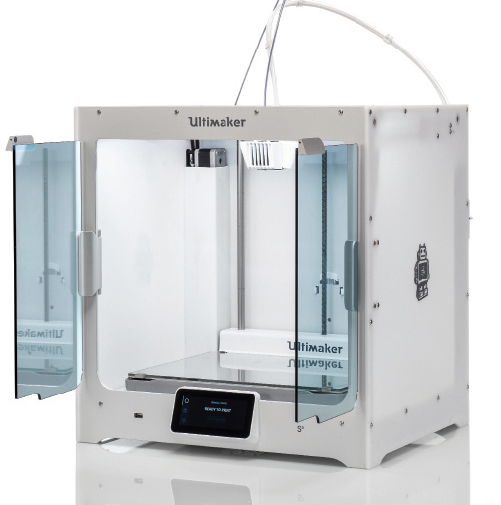
When DE reviewed the Ultimaker 3 in 2017, we were impressed by its mix of consumer-like conveniences and professional features. The company recently sent us the larger and improved Ultimaker S5, along with its new Tough PLA material. We put them to the test.
Before we even unboxed the Ultimaker S5, we were concerned with a large hole in the bottom of the 25.5x23.5x26-in. box that had been halfheartedly repaired with clear packaging tape. Recalling how well the Ultimaker 3 we previously reviewed had been packaged, though, we were optimistic that no damage had been done during shipping.
Like the Ultimaker 3, the S5’s fully-assembled translucent white side panels and steel frame were surrounded with thick foam, its build space had cardboard inserts and its dual-extrusion printhead was held in place with plastic ties. A well-stocked accessory box contained quick-start instructions, a calibration card, lubricant, a glue stick, Ethernet cable, USB and more. It looked like no damage had been done, so in about two minutes we had the Bowden tubes clipped into place, the NFC (near-field communication) equipped spool holder installed and plugged in, and slid in the hardened glass build plate. When the S5 powered up, we noticed a potential problem.
The one complaint we pointed out in our Ultimaker 3 review concerned that unit’s scroll-wheel-controlled screen interface being a little touchy. We were looking forward to trying out the S5’s new touchscreen interface. However, the image on the screen was shifted up and to the right, preventing us from selecting our language to finish the setup. No stranger to technology, we did what any experienced IT expert would advise: We turned off the printer, counted to 20 and turned it back on. No dice.
We shot an email to Ultimaker and called it a night. The next morning, on a whim, we powered up the Ultimaker S5 again and the touchscreen lit up with the company’s logo front and center, guiding us through the setup with no trace of the offset issue, which never happened again over more than two months of use. In addition to what appeared to be rough handling during shipment, the S5 was also delivered during the near-zero temperatures of the Polar Vortex, so perhaps it just needed a warm-up.
We followed the on-screen prompts to install the second print head, load materials (which, thanks to the NFC chips in the Ultimaker material spools, the printer identified as Tough PLA and PVA, adjusting settings accordingly), and begin the Wi-Fi connection process. We found the full-color touchscreen to be responsive and a nice improvement over the Ultimaker 3’s click-wheel interface, though we do wish there were a back-up method to access setup and some other critical commands—just in case. Ultimaker informed us that the only cases of defective touchscreens it has seen have been related to damage during transportation.
Although the ease of setup is reminiscent of an iPhone or other “no experience required” consumer product, the Ultimaker S5 is designed to be used in a professional environment. It looks the part, with minimalist black-and-white components, tinted glass doors and bright lights illuminating prints so you can easily see the progress in person or remotely via the built-in camera.
Unlike many consumer-focused printers, the S5 actively levels before every print, probing the build plate in a greater number of locations than the Ultimaker 3 for a flat first layer. We had no adhesion issues with any of our prints, and we ran through three spools of filament—using both Ultimaker’s materials and third-party materials. We did use painter’s tape on the glass before printing with ABS, just in case, as it is notorious for losing adhesion.

To accommodate many different materials, including Nylon, ABS, PVA, PLA, CPE, TPU, PP and more, the Ultimaker S5 uses two interchangeable print cores in the print head. The S5 comes with two type AA 0.4 mm cores and one type BB core for printing water-soluble support materials. Type CC cores for printing composite materials are also available, and nozzles are available in different sizes—from 0.8 to 0.25 mm. A chip in the cores lets the printer automatically identify the cores, making it easy to switch if you’d rather print with two colors of build material, for instance.
Material loading has also been approved in the S5, which has an abrasive-resistant feeder to handle composite materials. The feeder system also features a filament flow sensor that auto pauses and resumes when materials run out. We made use of this feature when a third-party spool of filament that did not appear to be as uniformly wound as the Ultimaker materials tangled on the spool. The Ultimaker S5 detected that the material wasn’t flowing and paused the print, allowing us to untangle the filament and continue printing with a push of the touchscreen.
Ultimaker Cura software is available as a free download. We used it to import, place and slice multiple models. It provides an estimated print time based on your chosen print settings. The software balances ease of use with power-user features by limiting the default user interface to show the most-used variables, and placing settings for finer control a few clicks away. The company has integrated Ultimaker Cura with professional CAD software, including SolidWorks, Siemens NX, and Autodesk applications.
Ultimaker also offers Cura Connect software to schedule print jobs to multiple 3D printers, monitor print progress and keep track of maintenance. If you’re on the go, Ultimaker’s app allows you to connect to Ultimaker 3D printers on a shared network to check their progress and manage the print queue. Notifications can be received through the app if you’re off the local network.
We didn’t start small with the Ultimaker S5. Out first print made use of the printer’s high resolution, larger build volume and support material, resulting in a 32-hour print. From there, we ran the 3D printer almost continuously, using up the 750 grams of Tough PLA included with the S5 and printing through 2 kg of PLA from two different third-party providers, plus a 14-hour ABS build from another third-party provider for good measure.
The Ultimaker S5 barely got a break, and never seemed to need one. Fused filament 3D printing is not fast, so an aborted 12-hour print at the 11th hour is not acceptable for a 3D printer targeted to professional use. We had no aborted builds with the S5, despite running out of material once mid-print and the third-party spool filament tangle mentioned earlier. Print quality was excellent, with only one corner warping issue (again, with the third-party filament), no over- or under-extrusion issues and no stringing or clogging during all our prints.
The Ultimaker S5 is marketed as delivering “industrial-class results.” It has the reliability, quality and networking features professionals are looking for and, at $5,995, the price tag to match. There are certainly cheaper fused filament 3D printing options available, but for design engineers who need consistent, quality 3D prints without taking time away from their day jobs to fuss with a finicky printer, the Ultimaker S5 lives up to its promises.

From the very beginning, our mission has been to accelerate the world’s transition to local manufacturing and digital distribution. Our passion is to deliver a 3D printing system that drives business success across the world. That’s why…

Insider Q&A: 3D Printing End Use Parts
In this Insider Q&A, the experts at Ultimaker explain how 3D printing can be used for spare parts, jigs and fixtures in a production environment.
Jamie Gooch is the former editorial director of Digital Engineering.
Follow DEJoin over 90,000 engineering professionals who get fresh engineering news as soon as it is published.


About Us · Contact Us · Editorial Team · Advertising · Privacy Policy · Subscriber Services · © 2026 Digital Engineering 24/7 · Peerless Media