Helping design and engineering professionals discover, evaluate and specify technologies and processes that shorten the design cycle and enable success.

Digital Engineering April 2026
In the latest issue of Digital Engineering, we take a look at the latest innovations in design for additive manufacturing, including the use of natural language inputs, social media cosplayers, and AI integration. The issue also includes a feature…

January Special Focus Issue: Design for Additive
In this Special Focus Issue of Digital Engineering, learn about the latest advancements in design for additive manufacturing, including new software tools, additive in automotive, custom medical devices, and more.
|
The world of reverse engineering is still emerging as technology support, user adoption, and workflow optimization continues to expand. Among those in the hardware market, it's clear that a huge number of organizations are active in developing devices that allow you to digitally capture physical form. Alongside the hardware developers is perhaps the most important component, the software.
I say the software is most important because you need the software to take the raw data from your capture device and do something useful with it. And while the reverse engineering software space mirrors the hardware side with multiple vendors doing different things, there is one key difference. It has a clear leader, both in terms of sales and technology.
North Carolina-based Geomagic has been leading the charge of reverse engineering software, ranging in solutions from modeling software to more recent activity in creating industry tools for solving specialized workflows, whether that's in dental or turbo-machinery. For our purposes, we'll take a look at Geomagic Studio 10. This can be split into two areas: There's a new module called Fashion, which I'm going to concentrate on, but first, there are updates that will affect most users. We'll look at those first.
The user interface has received some attention, as it has over the last few releases. The UI is more customizable, there are presets that will color and adapt the Studio Interface to match your workhorse MCAD system. Menus are now split into tabs and are collapsible and expandable features, so the least-used functions can be hidden. The team has also consolidated similar operations into single panels. For example, rather than separate operations for datums, features, etc., these are found in a single Features tab. Finally, the 3D model now rotates around the cursor —not a biggie, but this was requested by users and assists with focusing on the area of a model you're working on.
The final general update is the addition of support for multisensor metrology — a godsend if you want to combine the strengths of 3D scanners with hard probes. This allows you to capture a quick scan of an object then use a hard probe to create features such as cylinders, cones, and spheres, and to measure hidden areas for precise shape capture. It's not aiming to be a metrology application, but it does pay dividends for creating precise features for alignment and control.
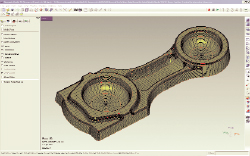
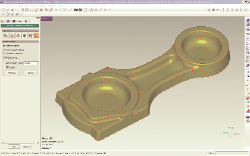
 This image illustrates how the model is divided into regions according to feature segmentation. |
Geomagic Fashion
The big-ticket item for Version 10 is the launch of Geomagic Fashion. This takes the company's knowledge of its space's technology and combines it with a rock- solid understanding of what users are seeking to achieve. It turns out that in many cases, this boils down to the creation of precise surfaces based upon a physical form, which can be used downstream for design modification or remanufacturing. The existing Studio workflows get you part of the way there, but they were developed to support replicating a physical part, rather than to create ideal surface geometry. Geomagic Fashion fills this process gap, so let's explore how it works and what it enables you to do.
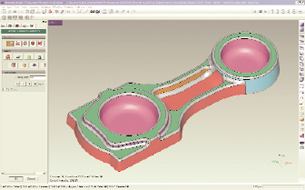 Here, regions of the model are divided by classification for optimized, modifiable surfaces. |
Once you have completed the scan, cleaned up the data, worked through the preprocessing stages, and have a good quality polygon mesh, you're ready to start creating surfaces. With Fashion's introduction you're now offered a choice; whether to use the existing Shape module or the new Fashion module. That choice depends on the output you need. If you want to create a series of MCAD readable surfaces that conform to that shape exactly, with all of the minute details, the bumps, dings, and whatnot that are always found in physical parts, then you use Shape. If, however, an explicit set of perfect surfaces that describe a much more precise version of that physical part is your goal, then Fashion is the way to go.
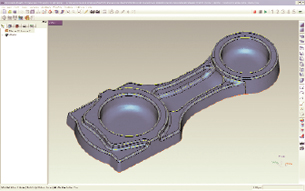
 Stitched CAD (or trimmed/untrimmed surfaces) generated. |
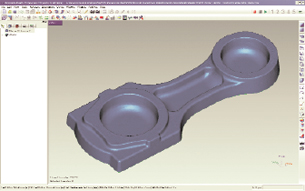
Fashion is driven from just six buttons, which step you through the process. The first is Detect Contours, which analyzes the part and presents a color-shaded display of regions that it finds. Unlike the existing workflow, which bases this analysis on curvature, Fashion is looking for design intent and various feature types. Yes, it uses curvature to achieve this, but the goal is that you're looking to color up each face within your part to identify features on which surfaces can be built.
|
You then classify these regions by intended shape (i.e., what sort of surface you're eventually going to use to recreate that geometry), including planar, extruded, cylinder, sphere, cones, as well as more MCAD-type operations such as extrusions (linear or drafted) and revolves or rotations. It's common for some complex surface areas to not conform to these ideals, so these are tagged as freeform. These regions are defined by color and you adjust them simply by painting the polygon triangles to change their assignment and segmentation. You then subdivide your polygon mesh, creating a series of curves at the intersection between the regions you previously created. These curves define the trimming boundaries for your surface geometry and as such, attention needs to be paid to ensure that they're as clean as possible. Because the system is creating them from a faceted mesh, the curves will not be perfect and you'll probably want to adjust them; smoothing and removing control points, and straightening some sections perhaps. The goal is a network of clean, high-quality curves and it's readily achievable using direct manipulation of the geometry. Once done, the system performs a check to ensure there are no crossover conditions (which can result in twisted surfaces).
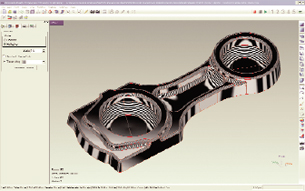 This image illustrates a "zebra" pattern showing the high quality of the exported MCAD model. |
Primaries & Transitions
Now, while this is similar to the existing workflows up until now, from here it departs. You can either work automatically or manually, but the goal is primitive surfaces that create a match between the physical data and design intent. The explicit surfaces are grouped into a two-step workflow — primaries and transitions.
Primaries are the major surface types and include analytical surfaces (planes, cylinders, cones, spheres), swept surfaces (extrusions, drafted extrusions, and rotationals), and freeform surfaces. You create the basic surface, and then use the boundaries to trim them. Each surface type has its own controls so that you can adapt it to meet the geometry or your requirements. The rotational surface is an excellent example — it will find the profile and the central axis that the profile is to be revolved around from the geometry you've identified. Both can be adjusted to your intent, which is particularly critical if you're working across a symmetry plane. There are also fitting parameters in terms of normal tolerance and it also allows you to apply concentricity to other cylindrical features. The Freeform surface gives you a lot of control over how it's built. Edge labeling allows you to adjust how a surface patch is built, giving you an extra level of control.
Transition surfaces cover things like fillets and chamfers or points where you're looking to create a blend between two or more surfaces. This handles two surface blends with ease and some tricky situations between three surfaces. It won't allow you to specify fillet radii or chamfer dimension — it just creates the surface. The workaround is to create your primary surfaces in Fashion, then export the surfaces to your MCAD system, then use that to create those specific features; it's what it's built for after all. While you are defining these surfaces and their trimming boundaries, the system also provides you with live tools to visualize the quality of the data you're creating.
Once done, the end result could be one of several things. A network of untrimmed surfaces that you intend to export into your MCAD system and trim and merge into a solid, or it might be a watertight solid where you have all the surfaces defined within Geomagic, or yet again it could be a combination of the two. You can even just output the curves if you're seeking to reconstruct the surfaces from scratch in your MCAD application. Whatever result you're looking for, the end result is a geometry set that is much more suited to downstream work with a MCAD system.
Fashion Forward
For those with Geomagic Studio already in house and a need for bulletproof, high-quality surfaces that replicate design intent rather than pure physical form, Fashion is a no-brainer. If the aim is to adopt reverse engineering processes within your organization, then Geomagic Studio should be on your short list of systems to evaluate. With the addition of this new module, however, chances are that it can solve all of your workflows in a more efficient manner.
Geomagic is a fascinating organization with a rapidly growing portfolio. What interests me most is how the company takes its ever-growing knowledge and applies it to various industries. The Fashion module is just one example and is an impressive addition to Geomagic Studio's arsenal.
Contributing Editor Al Dean is the former technology editor at MCAD Magazine, a UK product development and manufacturing technology journal, and is working on a number of projects that launch later this year. You can send comments about this article to [email protected].
Info
Geomagic
Research Triangle Park, NC
geomagic.com

DE's editors contribute news and new product announcements to Digital Engineering. Press releases may be sent to them via [email protected].
Follow DEJoin over 90,000 engineering professionals who get fresh engineering news as soon as it is published.


About Us · Contact Us · Editorial Team · Advertising · Privacy Policy · Subscriber Services · © 2026 Digital Engineering 24/7 · Peerless Media