Review: Artec Eva, Spider and Studio
The Eva (left) and Spider (right) scanners from Artec. Image courtesy of Artec 3D.


Latest News
July 1, 2015
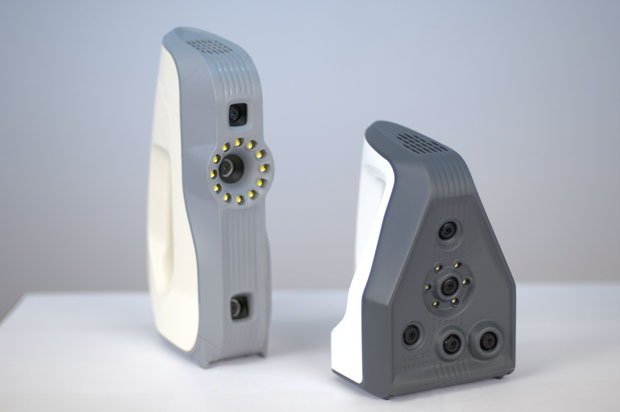
 The Eva (left) and Spider (right) scanners from Artec. Image courtesy of Artec 3D.
The Artec Eva and Spider are handheld 3D scanners around the size and shape of an old-fashioned home iron. Scanning with either is simple. You point the scanner at your desired object, press a button on the handle and scan. You can pause at any time by pushing the scan button again. When it’s time to restart, you’ll need to return the scanner close enough to a previous position so that the software can find its place again.
The scanning process is quite a bit like spray painting: You move your hand up and down, back and forth, rotating your wrist a bit and trying to get complete coverage. Scan from different angles as you go, and remember to direct the cameras at those hard-to-reach spots under overhangs or in recessed areas.
Both the Eva and the Spider have built-in illumination to ensure sufficient, even lighting on your textures. You can also turn the lights off if they are distracting and rely on ambient lighting.
Watch the Screen
As you scan, you’ll want to keep as much of the object’s surface as possible within the scanner’s field of view. Fortunately, you can see the scan happening onscreen in Artec Studio. In fact, it is essential that you be able to see the computer screen while you scan; there’s no other way of being exactly sure what is and isn’t getting scanned and to keep track of the distance to your object — something both scanners are very picky about. It doesn’t hurt if you can see the scanned object as well.
The ultimate solution would probably be to place your object at a comfortable height in the middle of an empty room, plug the scanner into a powerful laptop, and just walk around in circles, scanning as you go. That wasn’t an option for me; my laptop isn’t up to the task, so it was a workstation or nothing.
 My first scan had some major problems as I climbed the 3D scanning learning curve.
The scanners plug into two cords — an AC power cord and a USB data cable. The power cord is about 9 ft. long after the DC converter. The USB cable is just shy of 10 ft. long. If that’s not long enough, or you prefer not to risk tripping over cables while scanning, Artec offers a battery pack designed to work with their scanners and maximize mobility.
My office space, while fine for writing articles, is a bit cramped for 3D scanning. I set up a small table with a turntable on it, which allowed me to turn the object to be scanned and — in theory — keep the scanner itself in more or less the same place, moving the object rather than moving around it.
You can also take multiple scans from different angles (scan, rotate the object, scan again.) If you don’t need data from some angles — maybe you’re scanning a bust of Lincoln and you don’t really care what the bottom looks like — you can easily fill in the hole later in Artec Studio.
You can even hang the object from a cord of some sort. Below, Artec has a video using this technique to scan a fish.
Too Small for Eva
The Eva’s preferred scanning range of between 52 and 88 cm (approximately 2 to 3 ft.) was awkward for me when trying to spin the object with one hand and scan with the other. I was constantly coming too close or, worse yet, accidently pointing the scanner away from the object and losing registration. Also, while the Eva has a resolution of 0.5 mm, it seems to be happier with larger objects — say, a foot tall or more. Once I gave up on scanning tiny figurines and coffee cups, and moved up to a series of scans of my son’s head, the process became much easier.
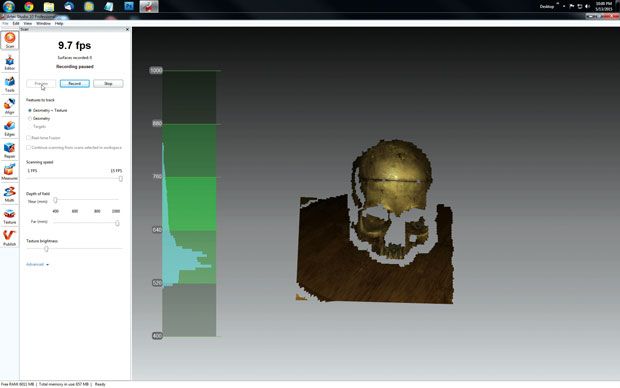 A 3D scan in progress. The histogram shows the object’s current distance from the scanner.
If your scanning needs run to smaller objects, Artec makes the Spider. The Spider has five times the 3D resolution (0.1 mm) and a much smaller working distance: around 7 in. to 1 ft. Despite a much narrower field of view and lower frame rate, the Spider usually suited my needs better than the Eva.
Erase, Align and Fuse
Once your scans are complete, you remove geometry that’s not part of your desired object. In my case, I had to cut away the turntable and, sometimes, bits of background items or my hand. There are a variety of eraser tools available in Artec Studio.
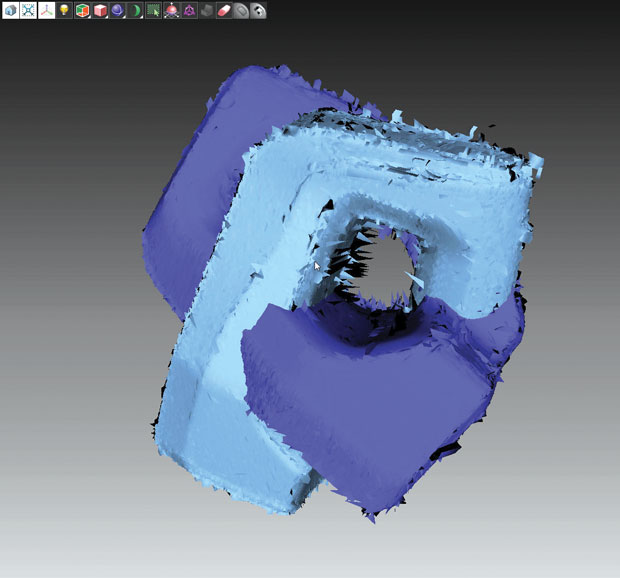 Two separate scans of an object, before registration, alignment, fusion and texturing.
Next, if you took multiple scans, you will need to align them. It can be a bit of a challenge to align disparate scans until you get the hang of it. I usually manually moved and rotated things until they were fairly close and then let Artec Studio’s automated tools take over.
A scan doesn’t immediately result in a single 3D object; rather, the scanning process produces multiple different snapshots — called frames — that contain bits and pieces of the whole. Artec Studio’s registration algorithms align the frames within a scan and between multiple scans. You can browse through these individual frames and manually eliminate bad ones (Artec Studio gives each frame a quality score).
When everything is lined up, it’s time to weld all of the frames together into what Artec calls a fusion — a single object built from the dozens or hundreds of individual frames. You can create a smooth fusion — good for relatively smooth objects (such as faces) — a sharp fusion — better for objects with planes angles and edges — or a fast fusion if you’re in a hurry. All allow you to fine-tune the resolution.
Real-Time Fusion
You can actually align frames all in one go, using Artec Studio’s real-time fusion. In this mode, the application continually stitches 3D frames together as you scan. As soon as you stop scanning, you’ve got a fused object. It’s the fastest and easiest way to scan, allowing you to skip the registration and fusion steps.
There are downsides, of course. Most importantly, the entire scan has to be completed in a single session; you cannot merge multiple scans and it’s often difficult — sometimes impossible — to scan an entire object in one go. Real-time fusion is also marginally less accurate and puts a real strain on your graphics card.
Post-Processing and Texture
Once your fusion is created, it’s time to remove anything you don’t want in the final object — stray bits of geometry and so forth. You can remove features, patch holes and smooth the mesh. Finally, you can perform a mesh simplification to reduce the “weight” of the object by reducing its polygon count. You have several settings to fine-tune the results.
 A scanned face published on Viewshape.
Your mesh is ready, but it has no texture. If you need one, now’s the time to create it. Artec Studio uses captured texture frames to create the final texture, so everything must be aligned and properly registered before this step. You can play with the texture’s brightness, hue, gamma, contrast and set the texture’s resolution.
Once everything looks good, you can export the model in a standard format such as OBJ or STL, or publish it directly to Viewshape, Artec’s online 3D model sharing site.
Ease of Use
As this was my first attempt at 3D scanning, I learned some things along the way. The scanners don’t especially care for shiny surfaces, black surfaces or transparent and translucent surfaces. They’re certainly not alone in this; all optical 3D scanners have problems in the same areas. They need surfaces that bounce light back in a predictable way.
Both Artec scanners prefer objects with lots of sharp edges. They don’t care for flat or repetitive geometry or texture. (Think of a checkerboard, it’s easy to get lost and mistake one black square for another, identical black square.)
That said, the Artec Eva and Spider are astonishingly easy to use. That doesn’t mean you’ll be getting great scans from the very beginning, though. If you’re anything like me, your first several scans will take a long time and result in mostly unusable data. But the more you work with them, the faster your scans will go, the fewer frames you’ll be producing and the better the quality those frames will be.
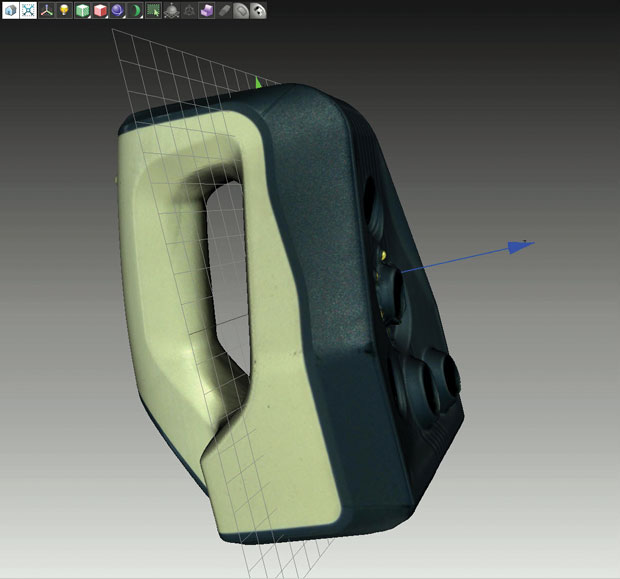 A 3D model of the Artec Spider, scanned with an Artec Eva.
Be prepared to put in some time. The $20,000 price tags should make it obvious that these 3D scanners are not intended as consumer products. And even lower-quality 3D scanning products, aimed more at the everyday user take time to learn to use well. However, for design engineers willing to invest a little time upfront, Artec’s Eva and Spider 3D scanners can save time and effort that would otherwise be spent building models from scratch.
More Info
Subscribe to our FREE magazine, FREE email newsletters or both!
Latest News
About the Author
Mark ClarksonContributing Editor Mark Clarkson is Digital Engineering’s expert in visualization, computer animation, and graphics. His newest book is Photoshop Elements by Example. Visit him on the web at MarkClarkson.com or send e-mail about this article to [email protected].
Follow DE

