Helping design and engineering professionals discover, evaluate and specify technologies and processes that shorten the design cycle and enable success.

Digital Engineering April 2026
In the latest issue of Digital Engineering, we take a look at the latest innovations in design for additive manufacturing, including the use of natural language inputs, social media cosplayers, and AI integration. The issue also includes a feature…

January Special Focus Issue: Design for Additive
In this Special Focus Issue of Digital Engineering, learn about the latest advancements in design for additive manufacturing, including new software tools, additive in automotive, custom medical devices, and more.
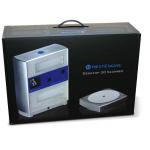
I get to review a lot of products, but I can't think of many that I've waited more impatiently to receive than NextEngine's Desktop 3DScanner. This compact peripheral was first unveiled last year in Las Vegas at SolidWorks World. With a price of $2,495, it takes a capability once available only to specialists using expensive equipment and puts it within reach of just about anyone.
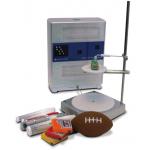 |
> > The NextEngine Desktop 3D Scanner consists of the scanner,Auto Positioner platform, and Part Gripper. NextEngine also includes several water-soluble marking pens, modeling clay, and a small easily scanned object.
The Desktop 3D Scanner consists of a laser scanner — a self-contained aluminum and polycarbonate unit about the size of a box of cereal — as well as an Auto positioner platform to capture multiple surfaces of objects and a Part gripper. to secure objects during scanning. The scanner houses two arrays of four Class 1M 10mW solid-state lasers and two twin 3.0 mega pixel CMOS RGB image sensors — each optimized for scanning at one of two fixed distances — as well as a pair of lights that illuminate the object being scanned to highlight its color and texture.
The Setup
The entire package comes in an elegant box. Simply remove the components, place them on a desk, download the NextEngine ScanStudio software from the company's website, and connect the scanner to a Windows XP-based workstation via the supplied USB 2.0 cable. The AutoPositioner's built-in cable connects to the front of the scanner and also establishes the distance of the scanning platform from the scanner by fitting the cable into one of two slots on the underside of the Auto positioner
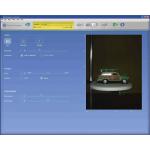 |
< < The scanner first illuminates the object and displays a preview image so you can adjust its position and select scanning options.
At the macro mode distance of 6.5 inches, the scanner has a field of view of 5.1 in. x 3.8 in. and an accuracy of 0.0005 in., with a maximum texture density of 400 samples (points) per inch. At the wide-angle mode distance of 15 inches, the scanner has a field of view of 13.5 in. x 10.1 in. and an accuracy of 0.015 in. and 150 samples per inch. Anything outside the field of view is not captured by the laser, but you can scan larger objects by doing multiple scans and then combining them using the ScanStudio software.
After setting up the scanner, you place the object you wish to scan on the Auto positioner and use the Part gripper., if necessary, to hold the object firmly in place. The Auto positioner can hold objects up to 20lbs.
Scan One
First, the scanner illuminates the object using the white lights and shows you a live onscreen image so that you can adjust the model on the scanning platform. (See the Image Gallery below for more.) You also determine the type of scan: a single scan,a bracket scan of three consecutive angles, or a 360-degree scan. For bracket and 360-degree scans, the Auto positioner automatically rotates after each scan. The angle of rotation between scans is dependent on the number of divisions you set. For example, selecting 8 divisions would rotate the object 45 degrees before each scan; a total of 8 scans for a 360-degree scan or 3 scans totaling a range of 135 degrees for a bracket scan.
 |
You can also adjust the color and finish settings to obtain the best scan, and control decimation (down sampling of point data) and smoothing of texture data.
Proper preparation of the object being scanned is important. NextEngine recommends applying powder to shiny or dark objects and white paint to transparent surfaces, and provides applicators for this purpose.
I scanned several different objects, including a bracketed scan of a bust of William Shakespeare and a 360-degree scan of a small toy car.It took approximately 15 minutes to do my initial scans: 2.5 minutes for each of six passes.
Aligning Scans
Once the scans were complete, I could rotate, pan, and zoom the resulting scans and use the various ScanStudio tools to trim away overlapping or unwanted areas and blend overlapping scans to better merge surfaces. I found that it was much easier to trim away the scanning platform and gripper from each individual scan before proceeding to the next step — aligning the individual scan passes to create a 3D model — although you can do some additional trimming after performing alignment. I also found that it was often easier to trim scans when looking at mesh or point cloud views rather than color textural images.
 |
To align the individual passes, you use the software to place at least three virtual pins on two of the scans in the family. Using more pins may yield better accuracy. You can also improve alignment by placing alignment marks on the object before scanning. A red water-soluble pen is provided for this purpose, and NextEngine recommends 5 marks per facet of the object you're scanning.
Once I had aligned the six scans, I repositioned the toy car and made additional scans of its top and bottom, trimmed away extraneous material, and then used the alignment tools again to align these additional scans.
Wizards Help
When you're satisfied with the scan, you can save it in a number of formats, including OBJ, PLY, STL, VRML, U3D, and SCN format. Files can then be loaded into various programs, but one of the most intriguing aspects of the NextEngine scanner is its integration with SolidWorks Office Premium 2007.
 |
SolidWork's ScanTo3D add-in lets you start the ScanStudio software from within SolidWorks and load scan data directly into a SolidWorks part.You can also open mesh or point cloud scan data, prepare the data, and then convert it into a surface or solid model. Two wizards step you through the conversion process. The Mesh Prep wizard prepares and cleans up mesh or point-cloud files, producing a mesh feature from which you can create surfaces. You can simplify scan data by reducing the number of points or mesh vertices, smooth the mesh to eliminate jagged areas, and automatically detect and fill holes in the mesh.
 |
After preparing the mesh, you launch the Surface wizard, which has two modes of operation: Automatic or Guided. Automatic creation uses a single-step process to automatically create a solid model and works well for anatomical and organic shapes. Guided creation uses a multi-step process to create surfaces and is preferable for analytical surfaces or when you want to have more control over the resulting surfaces. Once the surface has been created, you can use other SolidWorks tools such as Trim, Knit, and Thicken to turn the surfaces into a solid model.
 |
There's no doubt that the NextEngine Desktop 3D Scanner is extremely cool, but be prepared to spend some time learning all the ins and outs.It took several attempts before I got the objects I wanted to scan prepared just right and several tries before I got the hang of aligning multiple scans. But for those willing to devote the effort, the NextEngine Desktop 3D Scanner is nothing short of amazing.
Here is a series of additional images showing off the NextEngine Desktop 3D Scanner that we could not could not get in the hard copy version of this article. —DE Editors
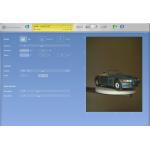 | 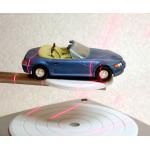 |
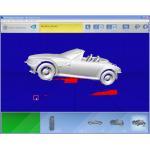
The image on the left is you what would see of the model car in the ScanStudio viewfinder as you beginning scanning. This view enables you to see exactly what you're about to scan. On the right, the scanning has begun. The NextEngine leverages multi-laser stripes that sweep across the surface of the model to capture geometry details. The four laser stripes provide multiple readings for each point to cross-validate captured data.
 | 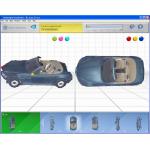 |
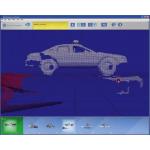
On the left, you can see that to align bracket or 360 degree scans,you place three or more "virtual pins" onto corresponding spots on a pair of scans. Marking alignment points on the object before scanning assists alignment. On the right is an example of how the trim tools in ScanStudio let you remove unwanted scan data.
 | 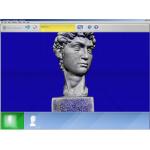 |
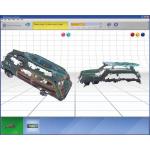
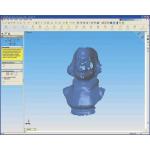
On the left, now it's David's turn to get the multi-laser stripes sweeping across its surface. On the right, the scanned model of Michelangelo's David has been brought into SolidWorks 2007 Office Premium to process with ScanTo3D.
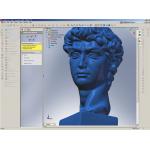 |
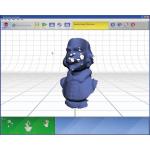
Here's a mesh view of the bust inside ScanStudio after scan data has been combined and aligned.
NextEngine Desktop 3D Scanner—At a Glance
NextEngine, Inc.
Santa Monica, CA
 |
> Price: $2,495
> Size: 8.8 in. x 3.6 in. x 10.9 in.
> Weight: 7 pounds
> Interface: USB 2.0 high-speed interface; USB cable included
> Power: 100-240VAC (built-in world-wide auto-switching power supply; AC cable included)
> System Requirements: 2GHz PC; 2GB RAM; 128MB graphics; Windows XP; powered USB hub recommended
David Cohn is a computer consultant and technical writer based in Bellingham, WA, and has been benchmarking PCs since 1984. He's a contributing editor to Desktop Engineering, an applications engineer with The PPI Group, the former editor-in-chief of Engineering Automation Report and CADCAMNet, and the author of more than a dozen books. You can contact him via e-mail at [email protected] or visit his website at www.dscohn.com. Or send your comments about this article through e-mail by clicking here. Please reference "NextEngine" in your message.

David Cohn is a consultant and technical writer based in Bellingham, WA, and has been benchmarking PCs since 1984. He is a Contributing Editor to Digital Engineering, the former senior content manager at 4D Technologies, and the author of more than a dozen books. Email at [email protected] or visit his website at www.dscohn.com.
Follow DEJoin over 90,000 engineering professionals who get fresh engineering news as soon as it is published.


About Us · Contact Us · Editorial Team · Advertising · Privacy Policy · Subscriber Services · © 2026 Digital Engineering 24/7 · Peerless Media